Business Scenario: Need to transport some table records from development system to the Test System. Here three cases are considered. Case 1. If there is no TMG for the table, how to transport the records. Case 2. In there is a TMG for the table is present then how to transport the records. Case 3. Directly from SE09 adding the records to the workbench request.
Case 1.
Step1. Go to SE11.

Step2. Provide the table name name 'ZSTUDENT_DET1' and click on display button.

Step3. Some of the table entries are already created without the TMG. Click on the Display contents button.

Step4. The table contains 4 records.

Step5. Select the the records need to transport to the Quality system. Here we have selected all the records and from the menu Table Entry click on Transport Entries.

Step6. Click on Create button to create a New Request.

Step7. Provide the description and click on the SAVE button.

Step8. The Request is created and click on Continue button.

Step9. Now go to SE10.

Step10. Click on the display button and provide the Request number created above.

Step11. Double click on the Task under the request.

Step12. One entry is created Under the Task. Click On the KEY under the Function column.

Step13. The mandt and the primary value of the records are populated here. Now click on the Contents button.

Step14. Select the radio button as highlighted and click on Continue button.
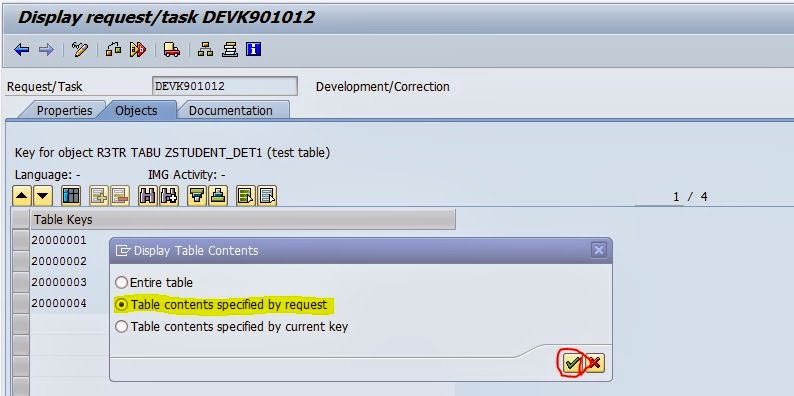
Step15. All the Non primary filed values also added to the task under the created request.

______________________________________________________________________________
Case 2: Creating the table and then creating the table TMG and adding the records and then transporting the records from Dev system to Quality system.
Step1. The table ZSTUDENT_DET2 is created with following fields and activated.

Step2. Create the TMG by following the highlighted path.

Step3. Provide the details and select the radio button as highlighted and Save it. Go Back.

Step4. Create some table records.

Step5. Click on New Entries button.

Step6. Provide some values and save it and go back.

Step7. Click on the contents button.

Step8. It shows the above created values.

Step9. Select the records & from the menu Table Entry the TRANSPORT ENTRIES button is deactivated as there is a TMG created for the table.

Step10. Go to SM30.

Step11. Provide the table name and click on Maintain button.

Step12. Select the records and From the menu Table view select Transport.

Step13. Provide the Request Number and click on continue button.

Step14. Select teh Button Include In Request.

Step15. Go to SE09 and display the request and double click on the Task under the request.

Step16. Click on the Key button under the Function column.

Step17. The primary field values and displayed here and click on Contents button.

Step18. Select the highlighted radio button and click on continue button.

Step19. The non primary key fields are also added to the request.

______________________________________________________________________________
Case3: Directly from SE09 adding table records to the Request.
Step1. Go to tcode- SE09.

Step2. Click on the create button.

Step3. Select the Workbench request & click on continue button.

Step4. Provide the short text and click on save button.

Step5. Double click on the request number.

Step6. Click on the change button.

Step7. A new editable line appears.
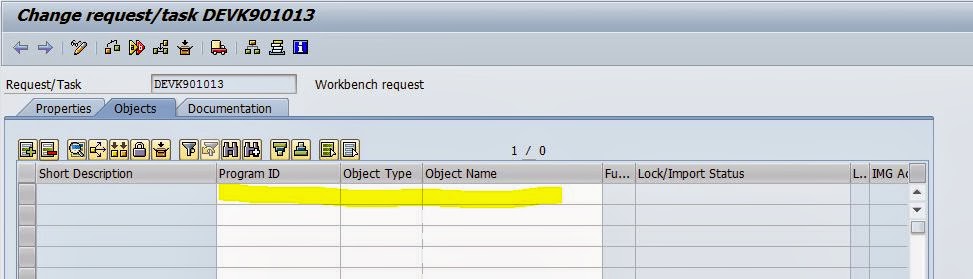
Step8. Provide the details like: ProgramID: R3TR, Object type- TABU and Object name: SCARR(here we are transporting data from scarr table) and click on the key button.

Step9. The below screen appears.

Step10. Provide the client (200) and the key field value of the table SCARR and then clcik on the contents button.

Step11. Select the highlighted radio button and click on Continue button.

Step12. The non primary key fields of the added key fields also included in the request.

Step13. Save it and from the pop up click on Yes.

Step14. Now the records are added to the request to be transported to the Quality system.

_______________________________________________________________________________
Case 1.
Step1. Go to SE11.
Step2. Provide the table name name 'ZSTUDENT_DET1' and click on display button.
Step3. Some of the table entries are already created without the TMG. Click on the Display contents button.
Step4. The table contains 4 records.
Step5. Select the the records need to transport to the Quality system. Here we have selected all the records and from the menu Table Entry click on Transport Entries.
Step6. Click on Create button to create a New Request.
Step7. Provide the description and click on the SAVE button.
Step8. The Request is created and click on Continue button.
Step9. Now go to SE10.
Step10. Click on the display button and provide the Request number created above.
Step11. Double click on the Task under the request.
Step12. One entry is created Under the Task. Click On the KEY under the Function column.
Step13. The mandt and the primary value of the records are populated here. Now click on the Contents button.
Step14. Select the radio button as highlighted and click on Continue button.
Step15. All the Non primary filed values also added to the task under the created request.
______________________________________________________________________________
Case 2: Creating the table and then creating the table TMG and adding the records and then transporting the records from Dev system to Quality system.
Step1. The table ZSTUDENT_DET2 is created with following fields and activated.
Step2. Create the TMG by following the highlighted path.
Step3. Provide the details and select the radio button as highlighted and Save it. Go Back.
Step4. Create some table records.
Step5. Click on New Entries button.
Step6. Provide some values and save it and go back.
Step7. Click on the contents button.
Step8. It shows the above created values.
Step9. Select the records & from the menu Table Entry the TRANSPORT ENTRIES button is deactivated as there is a TMG created for the table.
Step10. Go to SM30.
Step11. Provide the table name and click on Maintain button.
Step12. Select the records and From the menu Table view select Transport.
Step13. Provide the Request Number and click on continue button.
Step14. Select teh Button Include In Request.
Step15. Go to SE09 and display the request and double click on the Task under the request.
Step16. Click on the Key button under the Function column.
Step17. The primary field values and displayed here and click on Contents button.
Step18. Select the highlighted radio button and click on continue button.
Step19. The non primary key fields are also added to the request.
______________________________________________________________________________
Case3: Directly from SE09 adding table records to the Request.
Step1. Go to tcode- SE09.
Step2. Click on the create button.
Step3. Select the Workbench request & click on continue button.
Step4. Provide the short text and click on save button.
Step5. Double click on the request number.
Step6. Click on the change button.
Step7. A new editable line appears.
Step8. Provide the details like: ProgramID: R3TR, Object type- TABU and Object name: SCARR(here we are transporting data from scarr table) and click on the key button.
Step9. The below screen appears.
Step10. Provide the client (200) and the key field value of the table SCARR and then clcik on the contents button.
Step11. Select the highlighted radio button and click on Continue button.
Step12. The non primary key fields of the added key fields also included in the request.
Step13. Save it and from the pop up click on Yes.
Step14. Now the records are added to the request to be transported to the Quality system.
_______________________________________________________________________________