--------------------------------------------------------------------------------------------------------------------------------------
Step1. In our search and display list screen, need to enable the link for the billing type field and on click on certain billing type, its relevant customizing value should be displayed in the pop up fpm screen in different sections.

Step2. Go to Tx- SPRO. Open billing types.

Step3. Double click on billing types.

Step4. Double click on any billing type like F2.

Step5. Here we have the set up for the bill type F2.

Step6. This information are stored in TVFK table. Some of the filed info we need in our FPM pop up screen. Just marked which we need.

Step7. For the pop up screen we need a feeder class. Go to Tcode- SE24 and create a class and implement the below two interfaces.

Step8. Implement and active each method. FOr our popup screen design Go to the method GET_DEFINITION.

Step9. Provide below code. Activate the method and feeder class.

Step10. Go to Tx- SE80 . Our popup screen would be a FORM UIBB. So open the below webdynpro component & right click on the Componnnet configuration. Create.

Step11. The below screen appears.

Provide a component configuration name and click on New button to create it.
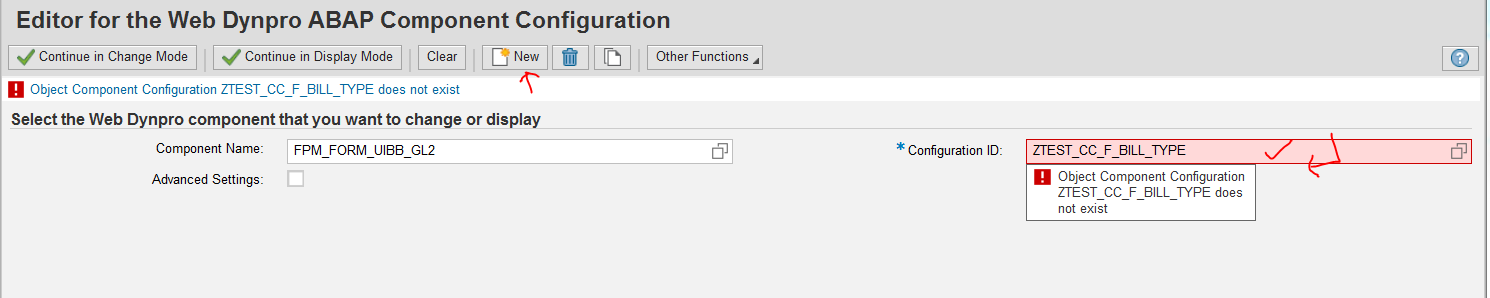
Step12. Provide the description and OK.

Save in package.

Step13. Ask for a feeder class.

Provide the feeder class that we have created in prestep. Then OK.

Step14. The left hand side field are available as we have passed the structure TVFK in the method GET_DEFINITON.

Step15. From the drop down choose Add Group.

Step16. Similarly add 4 groups.

Step17. Select each group and change the text as per required.

Step18. First Group as: General Info.

Second Group as: Cancellation Info.

Third Group as: Pricing Info.

Fourth Group as: Output Info.

Step19. All group text is maintained properly.

Step20. Select each group ad add elements to it.

Step21. select relevant fields and ok.

Step22. So 4 fields are added to group 1.

Step23. Now drag and drop the fields on group 2 as needed.
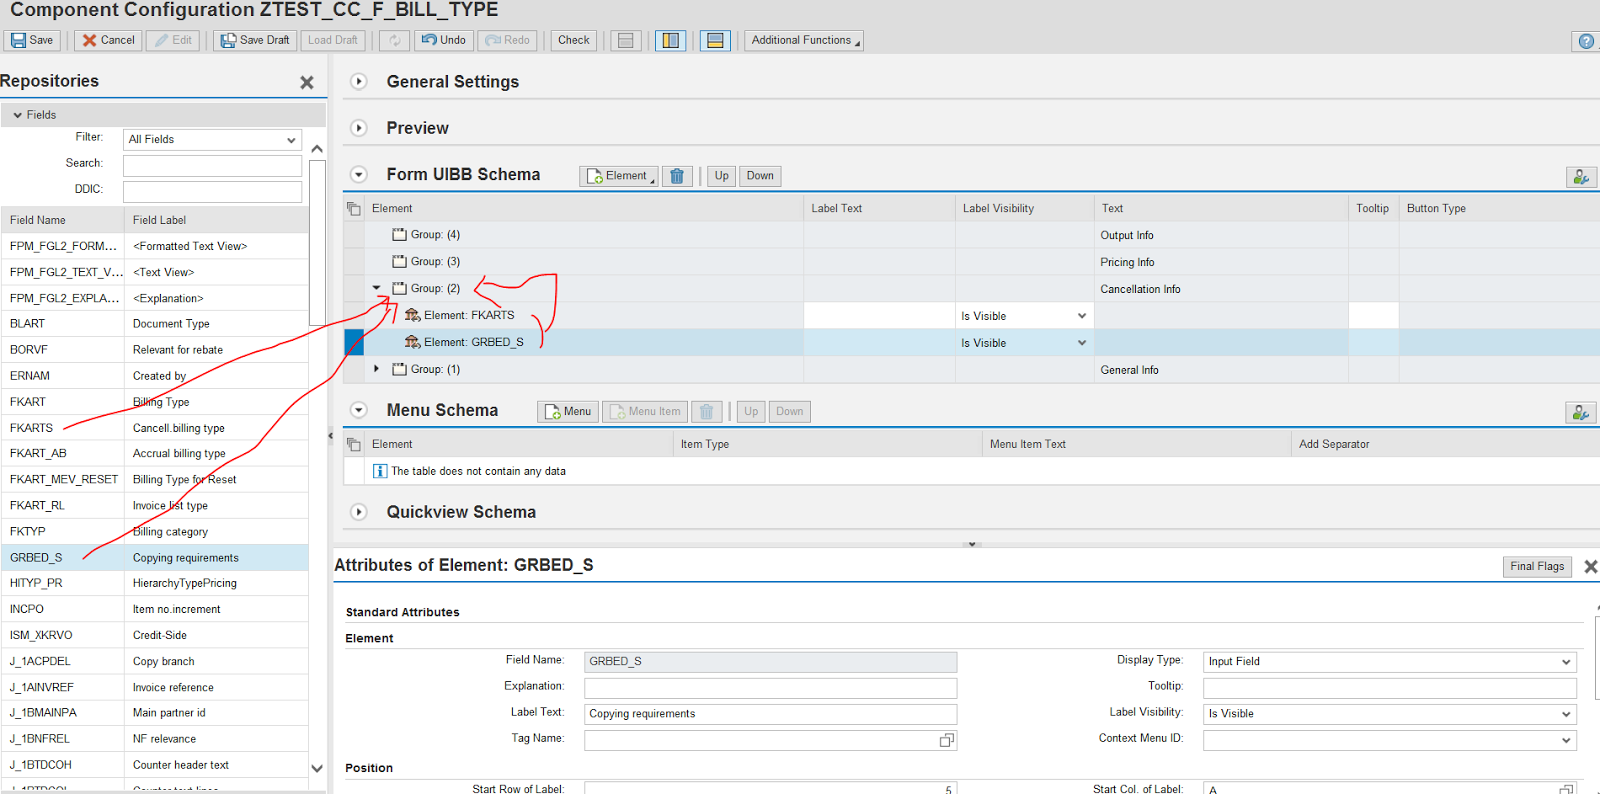
Step24. Now drag and drop the fields on group 3 as needed.

Step25. Now drag and drop the fields on group 4 as needed.

Step26. Preview the design. Save it and close.

Step27. Now in our application configuration, we have to create a pop up page and we have to configure the above create form component configuration. In SE80 open the application configuration. Click on display configuration.

Step28. click on the configuration name.

Step29. Click on Edit button.

Step30. Form the left side panel, New->choose dialog box.

Step31. Change the title. Remember the Dialog box page id as 'PAGE_2' we need this page id when calling the dialog box screen.

Step32. From the UIBB drop down, select Form component.

Step33. The below screen appears.

Step34. provide the pre created form uibb component configuration and hit enter key. Select the line and click on Configure UIBB.

Step35. We reach here. To go back click the marked link.

Step36. Save it.

Step37. Execute our application configuration.

Now we have to make billing type filed as a link and on click on it, the modal dialog box should open.

Step38. Go to the feeder class, get_definition method of the list uibb. Define an action.

Step39. In Tx- SE80, open the application configuration and click on display configuration.

Click con the link configuration ID.

Select the list uibb and click configure uibb.

Step40. So our defined action is available in the left hand side. Choose the column FKART.

Change Display type to Link to action and provide FPM event ID as DISP_BILL_TYPE. Save and close the screen.

Step41. Run the application configuration in SE80. Now bill type field appears as a link.

Step42. Now go to the feeder class of the list uibb and go to the method process event. Provide below code under event DISP_BILL_TYPE. So it will read the bill type on click and set teh event data nd launch the dialog box screen.

Step43. Now go to the form uibb. In the method get data, read the event data which is the value of the billing type. Based on this get the billing type details form the TVFK table. Set the data to UI an d make it as read only else the data will appear in edit mode.

Define the below global structure in the form feeder class attribute.

Step44. Run the application. Click on one billing type.

Step45. So here we have the pop up screen.

Step46. test for a different billing type.

-------------------------------------------------------------------------------------------------------------------------------------
Step1. In our search and display list screen, need to enable the link for the billing type field and on click on certain billing type, its relevant customizing value should be displayed in the pop up fpm screen in different sections.
Step2. Go to Tx- SPRO. Open billing types.
Step3. Double click on billing types.
Step4. Double click on any billing type like F2.
Step5. Here we have the set up for the bill type F2.
Step6. This information are stored in TVFK table. Some of the filed info we need in our FPM pop up screen. Just marked which we need.
Step7. For the pop up screen we need a feeder class. Go to Tcode- SE24 and create a class and implement the below two interfaces.
Step8. Implement and active each method. FOr our popup screen design Go to the method GET_DEFINITION.
Step9. Provide below code. Activate the method and feeder class.
Step10. Go to Tx- SE80 . Our popup screen would be a FORM UIBB. So open the below webdynpro component & right click on the Componnnet configuration. Create.
Step11. The below screen appears.
Provide a component configuration name and click on New button to create it.
Step12. Provide the description and OK.
Save in package.
Step13. Ask for a feeder class.
Provide the feeder class that we have created in prestep. Then OK.
Step14. The left hand side field are available as we have passed the structure TVFK in the method GET_DEFINITON.
Step15. From the drop down choose Add Group.
Step16. Similarly add 4 groups.
Step17. Select each group and change the text as per required.
Step18. First Group as: General Info.
Second Group as: Cancellation Info.
Third Group as: Pricing Info.
Fourth Group as: Output Info.
Step19. All group text is maintained properly.
Step20. Select each group ad add elements to it.
Step21. select relevant fields and ok.
Step22. So 4 fields are added to group 1.
Step23. Now drag and drop the fields on group 2 as needed.
Step24. Now drag and drop the fields on group 3 as needed.
Step25. Now drag and drop the fields on group 4 as needed.
Step26. Preview the design. Save it and close.
Step27. Now in our application configuration, we have to create a pop up page and we have to configure the above create form component configuration. In SE80 open the application configuration. Click on display configuration.
Step28. click on the configuration name.
Step29. Click on Edit button.
Step30. Form the left side panel, New->choose dialog box.
Step31. Change the title. Remember the Dialog box page id as 'PAGE_2' we need this page id when calling the dialog box screen.
Step32. From the UIBB drop down, select Form component.
Step33. The below screen appears.
Step34. provide the pre created form uibb component configuration and hit enter key. Select the line and click on Configure UIBB.
Step35. We reach here. To go back click the marked link.
Step36. Save it.
Step37. Execute our application configuration.
Now we have to make billing type filed as a link and on click on it, the modal dialog box should open.
Step38. Go to the feeder class, get_definition method of the list uibb. Define an action.
Step39. In Tx- SE80, open the application configuration and click on display configuration.
Click con the link configuration ID.
Select the list uibb and click configure uibb.
Step40. So our defined action is available in the left hand side. Choose the column FKART.
Change Display type to Link to action and provide FPM event ID as DISP_BILL_TYPE. Save and close the screen.
Step41. Run the application configuration in SE80. Now bill type field appears as a link.
Step42. Now go to the feeder class of the list uibb and go to the method process event. Provide below code under event DISP_BILL_TYPE. So it will read the bill type on click and set teh event data nd launch the dialog box screen.
Step43. Now go to the form uibb. In the method get data, read the event data which is the value of the billing type. Based on this get the billing type details form the TVFK table. Set the data to UI an d make it as read only else the data will appear in edit mode.
Define the below global structure in the form feeder class attribute.
Step44. Run the application. Click on one billing type.
Step45. So here we have the pop up screen.
Step46. test for a different billing type.
-------------------------------------------------------------------------------------------------------------------------------------
No comments:
Post a Comment